
TL;DR
- Most messy setups have a routing problem, not a cable-count problem.
- Start with one exit path, one power zone, and only enough slack for movement.
- The cheapest visual improvement usually comes from shortening two or three obvious cable runs, not buying a giant organizer kit.
- Do not use extension cords as permanent desk wiring or chain multiple plug devices together; if you truly need more outlets, that is a layout or electrical issue, not a cable-sleeve issue. (esfi.org)
- A clean setup should still be easy to service: you should be able to move a monitor, swap a keyboard, or unplug one device without taking apart the whole system.
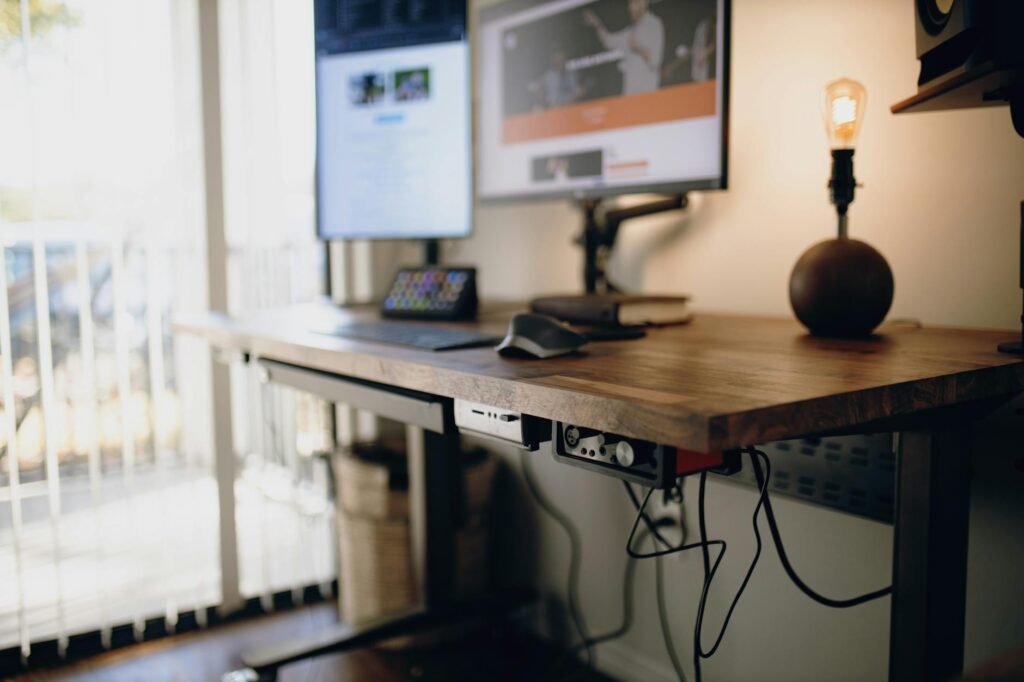
You could have as many as 8 devices connected to your desk and it could look tidy, and you can also have 4 devices connected and look completely chaotic. The way the desk appears will usually have more to do with visibility than the actual amount of devices. When cables cross each other in open sightlines; drop to the ground at different places; and collect behind a monitor stand making it look like an extremely large black wad, the overall appearance of the setup will look incomplete, even though each device is working properly from a functional standpoint. The solution to this problem is typically going to cost less than most people think, IF they would just quit buying random clips and start with a route.
There is also a money angle here. Plenty of people spend $80 to $150 on organizers, sleeves, cable boxes, and replacement accessories, then end up with the same mess because they never solved the core layout problem. A better approach is to identify which cables must stay visible, which can move under the desk, which are too long, and which are creating avoidable risk around power strips, extension cords, and pinch points. UL, OSHA, and ESFI all emphasize matching load to the power device, protecting cords from damage, and avoiding the use of flexible cords as a substitute for permanent wiring. (esfi.org)
Start with the CABLE Score before you buy anything
This five-part audit helps you identify why your setup still looks cluttered. Award yourself a score of 0-2 for each item. An overall score of 10 demonstrates a clean and usable set-up. If your score is 5 or less, it’s likely a structural issue rather than a cosmetic problem.
| Category | 0 points | 1 point | 2 points |
|---|---|---|---|
| C = Crossings | You can see several cables crossing each other from the chair or doorway. | One crossing is visible, but it is controlled. | No obvious visible crossings. |
| A = Anchors | Cables hang freely with no clear start and finish points. | Some runs are clipped, but others droop. | Each cable run is anchored at the desk, monitor arm, or underside. |
| B = Bricks | Power bricks sit on the desk or floor in plain view. | Some bricks are hidden, while others are still exposed. | Power bricks and excess length are mounted or contained out of sight. |
| L = Length match | Several cables are far longer than needed. | One or two cables are too long, but manageable. | Most cables are close to the required length, with only a small service loop. |
| E = Expansion | Adding or removing one device would force a full redo. | You can swap some items, but not easily. | You can unplug or add a device without cutting everything apart. |
If your score is really low, then do not start with the braiding of sleeves or using decorative clips. Start with fixing the cable path first. For most home-based configurations, the best sequence to follow is very simple. Choose one corner in the back of the room or one channel underneath the desk to relocate power and run all permanent cables to that location before dealing with the remaining visible drops (if any).
The mistakes that make even expensive setups look sloppy
1. Buying organizers before choosing a cable path
People typically fail at this step. After they buy clips, trays, sleeves, and a cable box all at once, they realize that the cable for their monitor still goes out to the left, the PC tower is still on the right side of the desk, and that their power strip will still be half-way down the side of the desk. Then they end up with a very expensive mess. The first thing you need to do is decide where your cables will go: into one of the back corners of your desk, or under the tray of your desk; or down the wall. Your hardware should support the cable route, not create it.
2. Keeping stock cables that are far too long
Cables that are far longer than needed create visible loops, bulky coils, and thick bundles that are difficult to hide. You do not need to replace every cable, but replacing two or three of the most visible overlong runs can make the whole setup look cleaner. It is not necessary for you to replace each of your cables, but by replacing just two or three of your most visibly offending cables, you will instantly change the overall appearance of your desk. Some good places to start are displaying cables for your monitors, hub connecting cables (USB) running to your speakers and network cables. Provide yourself enough slack in your cables to allow for noticeable movement; but stop treating your cables as though they need to be able to reach across the room.
3. Hiding the desktop but ignoring the underside
From where you sit, a work space may appear to be clean. But when viewed from the side they can look a complete mess due to the majority of their mess being shoved under the desk. This will typically mean that there will be a loose power strip with power bricks hanging out of it and without the cable bundle completely visible when entering the room. The better solution is to create an under-desk power area with either a tray, basket, or a mounted power strip, and then to attach the cables to this zone. This way the cables will not be wandering around the area, they will only be dwelling in the designated area.
4. Using too many tiny clips instead of a few strong anchor points
10 adhesive clips will often look worse than 3 well-placed anchors can. Using excessive amounts of adhesive clips creates a busy-looking wire path that is difficult to keep up with and frustrating to work on (service). A better practice would be to utilize a single bundle route with a single anchor point at each device and only drop into the power zone area once. Use clips when your cable is thin and temporary, otherwise use containment when your cable is thick and permanent.
5. Forgetting that moving gear needs controlled slack
Monitor arms, sit-stand desks, and laptop trays all need a service loop. Without it, cables pull tight, unclip, or bend awkwardly at the connector. With too much slack, they sag into view. The goal is a short, intentional loop that allows the full range of motion without creating a hanging arc. OSHA also notes that flexible cords should be protected from damage and provided with strain relief, which is a useful rule for home desk setups too. (osha.gov)

6. Solving a layout problem with power-strip stacking
A second strip plugged into the first feels like a quick fix, but it usually means the desk was never given a real power plan. ESFI says multiple plug outlets should be plugged directly into mounted receptacles rather than chained together, and UL warns that outlet count does not tell you how much load a strip can safely handle. If you need more reach or more capacity, rethink the desk position, mount one properly sized strip in a better spot, or have an electrician add an outlet where the desk actually lives. (esfi.org)
7. Treating an extension cord like permanent furniture
Extension cords are for temporary needs, not for becoming the hidden backbone of your office for three years. ESFI and OSHA both say flexible cords should not substitute for fixed wiring, and they should not be run through walls, floors, ceilings, or similar concealed paths. If your ideal cable management plan depends on hiding an extension cord where you cannot inspect it, the plan is wrong. (esfi.org)
A realistic example: the $54 reset that beats the $180 shopping spree
A standard midrange setup is made up of a single desktop tower, 2 x 27-inch monitors, a laptop dock, speakers, keyboard, mouse, webcam, phone charger, etc. The look of the desk when viewed from the door is cluttered with three monitors’ worth of hanging cables and two power bricks on the floor, and a coiled six-foot USB-C cable behind the dock, and a loose power strip under the back edge of the desk.
A typical panic buy might look like this: premium cable box for $35, decorative sleeve kit for $24, pack of magnetic clips for $18, RGB cable covers for $22, and a desk mat chosen mostly to hide wires for $79. Total: $178 before tax. That spend can still leave the monitor runs too long and the power area unmanaged.
A smarter reset could be: under-desk basket or tray for $22, reusable hook-and-loop ties for $8, adhesive anchors for $6, one shorter display cable for $10, and one shorter USB-C cable for $8. Total: $54. The visual improvement is bigger because the money goes toward path control and length control, not accessories that decorate the problem. That is the practical rule for this category: spend first on routing, second on length, and only then on concealment.
What to buy first, based on the mess you actually have
| Main problem | Best first purchase | Typical budget | Spend more only if |
|---|---|---|---|
| Visible cable loops behind monitors | Shorter display or USB cables | $8 to $25 per cable | You use a monitor arm and need routed channels or a longer certified cable for reach |
| Power bricks and strip visible under the desk | Under-desk tray, basket, or mounted strip | $15 to $40 | Your desk cannot support mounted hardware or you need a floor cable box |
| One cable has to cross open floor | Floor cord cover and a better route | $10 to $25 | The desk location cannot change and there is frequent foot traffic |
| Monitor arm cables sag during movement | Velcro ties and one controlled slack loop | $5 to $15 | The arm design has poor routing and needs replacement |
| Too many temporary charging cables on top | Charging dock or one rear-edge clip point | $10 to $35 | You rotate multiple devices daily and need a dedicated charging station |
| You swap gear often and the setup becomes a knot again | Simple labels and a service loop plan | $5 to $15 | You truly need a dock or USB switch for frequent device changes |
The 45-minute cable reset
- Take three photos before touching anything: seated view, doorway view, and under-desk view. Those angles reveal different problems.
- Unplug only after separating cables into three piles: always connected, sometimes connected, and charging-only.
- Pick one exit route for permanent cables. In most setups, one rear corner or one under-desk tray works best.
- Move power first. Mount or place the power strip where the fewest cables need to cross open space. Use a certified strip sized for the load, and do not chain strips together. (esfi.org)
- Replace only the longest visible offenders. You rarely need to replace everything.
- Run thick permanent cables first, then lighter accessories. This keeps the main bundle compact.
- Add one intentional service loop anywhere the desk or monitor moves. Make sure nothing is tight at the connector. (osha.gov)
- Label both ends if you have a dock, KVM, speakers, or external drives. Hidden cables are only useful if you can still identify them later.
- Finish with a service test: raise the desk, move the monitor arm, unplug one accessory, and check whether the route still looks clean.
Where simple fixes stop working
Certain configurations are designed to be difficult to set up. For example, glass desks may not permit use of adhesive anchors or mounted trays; sit/stand desks require additional cord slack and a route that is traveling with the desktop versus the wall. Corner desks can lead to very unnatural angles when using a monitor arm. Additionally, gaming pc setups are designed with pcs on top of the desk creating the most visible drop compared to towers that can be on a stand located under/beside the monitor.
If your first-pass cleanup still looks busy, the backup options are usually structural: move the tower, add a modesty panel, switch to a monitor arm with built-in routing, use a cable basket that holds bricks instead of just cords, or consolidate peripherals through a dock. And if the only way to make the desk work is to snake an extension cord through a wall, doorway, or hidden gap, stop there and solve the outlet problem correctly instead. (esfi.org)
WarningThis article is informational and focused on setup planning, not electrical contracting advice. If cords are damaged, plugs feel hot, you need additional outlets, or you are considering routing power through walls, floors, or other concealed spaces, use a licensed electrician. ESFI advises against using cords that are damaged or hot, and both ESFI and OSHA say flexible cords should not replace permanent wiring. (esfi.org)
Common mistakes people make during the cleanup
- Bundling every cable together, even when some need to move and some should stay fixed.
- Using permanent zip ties on cables that will probably be replaced or moved within a year.
- Leaving heavy power bricks unsupported so they drag the bundle downward.
- Sticking adhesive clips to dusty, oily, or textured surfaces and then blaming the clip when it fails.
- Creating giant coils of excess cable instead of replacing the worst offenders with shorter versions.
- Running a neat-looking route that puts tension directly on the connector. OSHA specifically calls for strain relief on flexible cords. (osha.gov)
- Focusing only on the front view and ignoring the side view and doorway view.
- Buying premium cosmetic accessories before fixing power placement and cable length.
How to pressure-test the result
A cable setup is successful only if it stays clean after a normal week of use. That means you need to test more than appearance.
- Photo test: compare the new seated, doorway, and under-desk photos to the originals.
- Motion test: move each monitor through its normal range and raise the desk fully if it is adjustable.
- Swap test: unplug one device you actually use, then reconnect it. If that creates a knot, the route is too fragile.
- Heat test: after a couple of hours, check the power strip and plugs. If a cord or plug feels hot, stop and reassess the load and device placement. ESFI warns against using cords that feel hot, and UL notes that the device rating matters more than the number of open outlets. (esfi.org)
- Cleaning test: vacuum or wipe around the desk without snagging anything.
- One-week test: if temporary charging cables, headphones, or a game controller keep ending up in the same visible spot, give that item a dedicated parking place instead of redoing the whole system.
Bottom line
The setups that look clean are usually not the ones with the most accessories. They are the ones with a clear route, shorter visible runs, hidden power clutter, and just enough slack to keep everything usable. Before you buy another sleeve, run the CABLE Score, fix the path, and spend where it changes the picture: power placement, cable length, and anchor points. That approach is cheaper, easier to maintain, and less likely to push you into unsafe power shortcuts. (esfi.org)
FAQ
What is the cheapest cable management upgrade that usually makes the biggest difference?
Generally speaking, this doesn’t require special products to look good on the surface. The use of Products such as an electrical cable cover are really not needed since they’re usually just replaced by an alternative location for the power strip or simply replacing long cabling with shorter cabling. All of this results in less visible cable clutter at the source of the electrical outlet.
Do I need to replace every cable with a custom-length version?
No. Replace the few cables that create the biggest visible loops. Many setups improve dramatically after two or three swaps, especially display and USB cables.
Are cable sleeves better than clips?
Each solves a unique need. A sleeve is great when you want one fixed bundle. A clip is a better choice when you need to neatly install very thin wire at a defined distance. If you use sleeves before selecting your path, they tend to conceal a poor choice in route.
Is it okay to hide a power strip in a basket or under-desk tray?
It can be, as long as the strip is appropriate for the load, accessible enough to inspect, and not part of a daisy-chained setup. UL stresses checking the rating of the strip against what you plug into it. (ul.com)
Can I run an extension cord permanently behind furniture for a clean look?
That is not a good long-term fix. ESFI and OSHA both say flexible cords should not be used as a substitute for permanent wiring, and OSHA prohibits running them through walls, floors, or similar concealed spaces. If your desk needs power in a different location, the better answer is usually outlet placement or a layout change. (esfi.org)
References
- Electrical Safety Foundation International: Extension Cord Safety Tips – https://www.esfi.org/extension-cord-safety-tips/
- UL Solutions: Guide to Power Strips and Surge Protectors – https://www.ul.com/insights/guide-power-strips-and-surge-protectors
- OSHA: 29 CFR 1926.405 Wiring methods, components, and equipment for general use – https://www.osha.gov/laws-regs/regulations/standardnumber/1926/1926.405
- OSHA: Extension Cords – 5 Things to Know (PDF) – https://www.osha.gov/sites/default/files/publications/OSHA4495.pdf